|
About Emulation | on Android | on System 7 Basilisk II (modern browser needed) can emulate a 68k Mac on Android devices using a virtual 680x0 Mac ROM chip, a virtual bootable disk with a Mac system between System 7.0 through 8.1 and the Macintosh Garden has a huge archive of compatible abandoned Classic Mac programs. Configuring your Virtual Mac on Android After installing Basilisk II, download a 68k Mac ROM and hard disk image with a 68k Mac OS and tell Basilisk II where the ROM and hard disk are. This is done when you first launch the emulator. The screen has four tabs called Volume, Memory/Misc, Graphic/Sound and Network. The tab you see when you open the emulator is the Volume tab.
After adding your Mac image, you should also select the 'HostFS Dir' button. This tells your emulator what folder to access inside of your emulated Mac. The Android folder you select will show up as a hard disk inside your Mac. You can use this folder to move files in and out of your Android folder. This is needed to add applications and games to your virtual Mac. The Memory/Misc tab is where you tell your emulator where your ROM file is by clicking the 'ROM File' button. You also specify your CPU type, Mac Model ID, both based on what 68k ROM you have, and the amount of RAM your Mac will run. Usually 32-64MB of RAM are enough for most Mac applications and games. The Graphics/Sound tab is where you can select your screen size and turn your Mac's sound on or off. For advanced users: the Mac screen size, and other settings, can be set manually by editing the emulator's preferences file, located in the emulator's Android folder by using an Android text editor. Only make changes to this file if you know how to safely do this. The Network tab lets you select the Internet (slirp) for online access inside your Mac. Once turned on, the Mac will need to be set-up to be able to access the Internet. On devices with trackpads or mice you can also disable the virtual mouse emulation needed for mobile touchscreens by clicking the change device configuration at the top of the emulator as soon as the emulator is opened, selecting mouse emulation, then mouse emulation mode and then choosing Desktop, no emulation. Getting Your Mac Online With a disk image with Mac OS 7.6.1 or 8.1, you need to have the TCP/IP control panel and all four Open Transport 1.3 or 1.3.1 68k extensions installed in the System Folder. If you have system 7.6.1, or if your do not have the Open Transport for 68k on your Mac OS 8.1 disk image, you will need to download and install them:
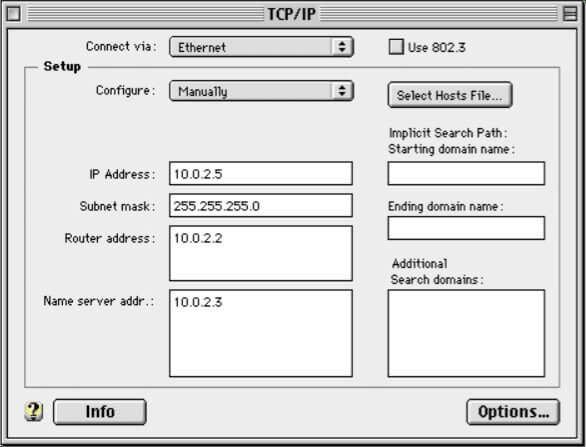
Note: an easy way to replace Open Transport 1.3 with the 1.3.1 files is to drag all of the old files to the desktop, then drag the new files and let go of them over the closed system folder. The Mac will place the files where they belong and you can restart your Mac. You can then delete or save the old files. Once Open Transport 1.3 or 1.3.1 are installed, you can open and set-up your TCP/IP control panel:
Then just restart your Mac and install and launch a web browser, i.e., iCab 2.9.9. Note: both these Open Transport 1.3 installer and 1.3.1 update system files work on all 68k Mac operating systems from 7.1 through 8.1. Author: cballero
Copyright 2026 System7Today.com
. |